DevelopWithJR.info

Image description

Building a Simple Calculator with Java

Indroduction


Image description

Ever wondered how those fancy calculators on your computer work? Well, the magic behind them isn't as complex as you might think! In this beginner-friendly blog series, we'll embark on a journey to develop our very own calculator program using Java, a powerful and popular programming language. No prior coding experience? No worries! We'll break down everything step-by-step, starting with the fundamentals of Java and gradually building our way to a functional calculator. You'll learn the basics of variables, operators, and control flow, all while putting your newfound knowledge to practical use.

Step 1: Import Library

import java.awt.Color;
import java.awt.event.ActionEvent;
import java.awt.event.ActionListener;
import javax.swing.JButton;
import javax.swing.JFrame;
import javax.swing.JLabel;
import javax.swing.SwingConstants

Breakdown of Imported Libraries

This table provides a breakdown of the imported libraries and their functionalities in Java applications.

Import Statement Purpose Key Functionality
import java.awt.Color; Provides classes and methods for working with colors.
  • Creating color objects with RGB values or predefined names (e.g., Color.RED, Color.BLUE).
  • Setting colors for graphical elements like buttons, labels, backgrounds, etc.
import java.awt.event.ActionEvent; Represents a user action (clicking a button, pressing a key). Handled by event listeners to initiate actions based on user interactions.
import java.awt.event.ActionListener; Defines the interface for classes that listen for actions. Used to create classes that respond to user actions through the actionPerformed method.
import javax.swing.JButton; Represents a clickable button component in Swing GUIs.
  • Displaying text or images on the button.
  • Triggering actions when clicked by a user.
import javax.swing.JFrame; Represents the main window or top-level container for Swing GUIs.
  • Setting window properties like title, size, and visibility.
  • Adding components like buttons, labels, text fields, etc., to create the user interface.
import javax.swing.JLabel; Represents a non-editable text component for displaying information.
  • Displaying text, numbers, or images.
  • Customizing alignment and font styles.
import javax.swing.SwingConstants; Provides constants for common alignment and orientation in Swing GUIs. Setting horizontal and vertical alignment of components (e.g., SwingConstants.CENTER, SwingConstants.LEFT).

Step 2: Create a Class Declare the Variables

create a class and implement ActionListener in the class

public class Calculater implements ActionListener {
private static final String Newvalue = null;
boolean isOperaterclicked=false;
JFrame jf;
JLabel Display;
JButton Sevenbutton;
JButton Eightbutton;
JButton ninebutton;
JButton fourbutton;
JButton fivebutton;
JButton sixbutton;
JButton onebutton;
JButton twobutton;
JButton threebutton;
JButton dotbutton;
JButton zerobutton;
JButton equalbutton;
JButton divisionbutton;
JButton multipicationbutton;
JButton minesbutton;
JButton pulsebutton;
JButton clearButton;
JButton SquareButton;
String oldvalue;
int pulse=0;
int mini=0;
int mult=0;
int divi=0;

Step 3: Create a Constructor

Create a constructor in the name of the classs
Calculater() {

Step 4: Create Frame


jf=new JFrame("Calculator");
jf.setLayout(null);
jf.setSize(600,600);
jf.setLocation(1300,200);
jf.setVisible(true);
jf.setDefaultCloseOperation(JFrame.EXIT_ON_CLOSE);

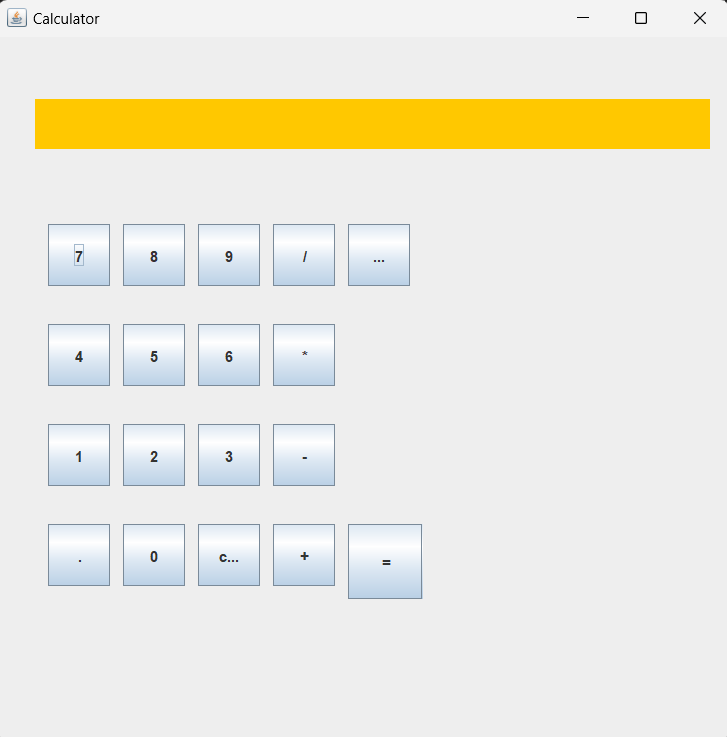
Step 5: Create buttons and label


Display=new JLabel("");
Display.setBounds(30, 50, 540, 40);
Display.setBackground(Color.orange);
Display.setOpaque(true);
Display.setHorizontalAlignment(SwingConstants.RIGHT);
Display.setForeground(Color.red);
jf.add(Display);
Sevenbutton=new JButton("7");
Sevenbutton.setBounds(40, 150, 50, 50); //button7
Sevenbutton.addActionListener(this);
jf.add(Sevenbutton);
Eightbutton=new JButton("8");
Eightbutton.setBounds(100, 150, 50, 50); //button8
Eightbutton.addActionListener(this);
jf.add(Eightbutton);
ninebutton=new JButton("9");
ninebutton.setBounds(160, 150, 50, 50); //button9
ninebutton.addActionListener(this);
jf.add(ninebutton);
fourbutton=new JButton("4");
fourbutton.setBounds(40, 230, 50, 50); //button4
fourbutton.addActionListener(this);
jf.add(fourbutton);
fivebutton=new JButton("5");
fivebutton.setBounds(100, 230, 50, 50); //button5
fivebutton.addActionListener(this);
jf.add(fivebutton);
sixbutton=new JButton("6");
sixbutton.setBounds(160, 230, 50, 50); //button6
sixbutton.addActionListener(this);
jf.add(sixbutton);
onebutton=new JButton("1");
onebutton.setBounds(40, 310, 50, 50); //button1
onebutton.addActionListener(this);
jf.add(onebutton);
twobutton=new JButton("2");
twobutton.setBounds(100, 310, 50, 50); //button2
twobutton.addActionListener(this);
jf.add(twobutton);
threebutton=new JButton("3");
threebutton.setBounds(160, 310, 50, 50); //button3
threebutton.addActionListener(this);
jf.add(threebutton);
dotbutton=new JButton(".");
dotbutton.setBounds(40, 390, 50, 50); //button.
dotbutton.addActionListener(this);
jf.add(dotbutton);
zerobutton=new JButton("0");
zerobutton.setBounds(100, 390, 50, 50); //button0
zerobutton.addActionListener(this);
jf.add(zerobutton);
equalbutton=new JButton("=");
equalbutton.setBounds(280, 390, 60, 60); //button=
equalbutton.addActionListener(this);
jf.add(equalbutton);
divisionbutton=new JButton("/");
divisionbutton.setBounds(220, 150, 50, 50); //button/
divisionbutton.addActionListener(this);
jf.add(divisionbutton);
multipicationbutton=new JButton("*");
multipicationbutton.setBounds(220, 230, 50, 50); //button*
multipicationbutton.addActionListener(this);
jf.add(multipicationbutton);
minesbutton=new JButton("-");
minesbutton.setBounds(220, 310, 50, 50); //button-
minesbutton.addActionListener(this);
jf.add(minesbutton);
pulsebutton=new JButton("+");
pulsebutton.setBounds(220, 390, 50, 50); //button+
pulsebutton.addActionListener(this);
jf.add(pulsebutton);
clearButton =new JButton("clear");
clearButton.setBounds(160, 390, 50, 50);
clearButton.addActionListener(this);
jf.add(clearButton);
SquareButton =new JButton("Square");
SquareButton.setBounds(280, 150, 50, 50);
SquareButton.addActionListener(this);
jf.add(SquareButton);

Step 6: Create another class name actionPerformed


@Override
public void actionPerformed(ActionEvent e) {

Step 7: Working of buttons and calculation operation


if(e.getSource()==Sevenbutton) {
if(isOperaterclicked) {
Display.setText("7");
isOperaterclicked=false;
}else {
Display.setText(Display.getText()+"7");
}
}else if(e.getSource()==Eightbutton) { if(isOperaterclicked) { Display.setText("8"); isOperaterclicked=false; }else { Display.setText(Display.getText()+"8"); } }else if(e.getSource()==ninebutton) {
if(isOperaterclicked) {
Display.setText("9");
isOperaterclicked=false;
}else {
Display.setText(Display.getText()+"9");
}
}else if (e.getSource()==fourbutton) {
if(isOperaterclicked) {
Display.setText("4");
isOperaterclicked=false;
}else {
Display.setText(Display.getText()+"4");
}
}else if (e.getSource()==fivebutton) {
if(isOperaterclicked) {
Display.setText("5");
isOperaterclicked=false;
}else {
Display.setText(Display.getText()+"5");
}
}else if (e.getSource()==sixbutton) {
if(isOperaterclicked) {
Display.setText("6");
isOperaterclicked=false;
}else {
Display.setText(Display.getText()+"6");
}
}else if (e.getSource()==onebutton) {
if(isOperaterclicked) {
Display.setText("1");
isOperaterclicked=false;
}else {
Display.setText(Display.getText()+"1");
}
}else if (e.getSource()==twobutton) {
if(isOperaterclicked) {
Display.setText("2");
isOperaterclicked=false;
}else {
Display.setText(Display.getText()+"2");
}
}else if (e.getSource()==threebutton) {
if(isOperaterclicked) {
Display.setText("3");
isOperaterclicked=false;
}else {
Display.setText(Display.getText()+"3");
}
}else if (e.getSource()==zerobutton) {
if(isOperaterclicked) {
Display.setText("0");
isOperaterclicked=false;
}else {
Display.setText(Display.getText()+"0");
}
}else if (e.getSource()==clearButton) {
Display.setText("");
}else if (e.getSource()==dotbutton) {
if(isOperaterclicked) {
Display.setText(".");
isOperaterclicked=false;
}else {
Display.setText(Display.getText()+".");
}
}else if (e.getSource()==divisionbutton) {
isOperaterclicked=true;
oldvalue=Display.getText();
divi=1;
}else if (e.getSource()==multipicationbutton) {
isOperaterclicked=true;
oldvalue=Display.getText();
mult=1;
}else if (e.getSource()==minesbutton) {
isOperaterclicked=true;
oldvalue=Display.getText();
mini=1;
}else if (e.getSource()==pulsebutton) {
isOperaterclicked=true;
oldvalue=Display.getText();
pulse=1;
}else if (e.getSource()==equalbutton) {
String Newvalue=Display.getText();
float NewvalueF=Float.parseFloat(Newvalue);
float oldvalueF=Float.parseFloat(oldvalue);
if(pulse==1) {
Float result = oldvalueF+NewvalueF;
Display.setText(result+"");
}else if(mini==1) {
Float result = oldvalueF-NewvalueF;
Display.setText(result+"");
}else if(mult==1) {
Float result = oldvalueF*NewvalueF;
Display.setText(result+"");
}else if(divi==1) {
Float result = oldvalueF/NewvalueF;
Display.setText(result+"");
}
}else if(e.getSource()==SquareButton) {
isOperaterclicked=true;
oldvalue=Display.getText();
float oldvalueF=Float.parseFloat(oldvalue);
float result1=oldvalueF*oldvalueF;
Display.setText(result1+"");
}

Step 8: Create main class and call the constructor


public static void main(String[] args) {
new Calculater();
}

Step 9:Run the Program

Image description